[ forums | old swut index | back to main ]
| |
[ forums | old swut index | back to main ] |
Egg's Super Nintendo + Game Doctor SF3 PageUpdated september 18, 2002 This document covers my experiences with getting a NTSC Game Doctor SF3 working with my PAL Super Nintendo, as well as using the Game Doctor SF3 itself. BTW: My Game Doctor is not for sale! Also, don't ask me where to get them as I have no idea, however www.cd64.com might have something similar. Intro
Getting the SF3 to work with my PAL SNESI didn't get the SF+SF3 to work straight away - the screen was in black and white and the writing was in chinese. After a little research on google I soon found out that I could load a utilities menu on the SF3 by holding down the R button on the controller whilst turning the console on. Up came the menu, including tools for formatting disks, copying games, etc. However I was still yet to get some colour into the screen. It soon struck me that the Super Famicon was an NTSC box (and NTSC output is always B/W on a PAL display), so I plugged the SF3 into my Gamesmen PAL SNES - but of course, it didn't work at all. After some thought and further research, I came to the conclusion that I either had to construct a NTSC-PAL converter for the Super Famicon, or take a punt and disable the region lockout chip on the Super Nintendo. The region lockout chip stops NTSC cartridges from working with PAL SNES's and visa versa. My theory was that the SF3 was really just another NTSC cartridge to the PAL SNES, and that if the lockout chip was disabled, then it would work, and in colour even. Well to cut a long story short, I disabled the lockout chip on the SNES and the Game Doctor SF3 worked. I didn't get around to making a PAL-NTSC converter for the SNES, although modifying one for a Playstation would be an interesting exercise - pinouts are readily available at gamesx. Opening up the SNES and doing the modOpening up a SNES is not a trivial task unless you have the right screwdriver (or bit). The only place in Australia that I know of that sells the special screwdriver bit that fits the SNES screws is Jaycar, and they want something like $22 for it - which is more than a little offputting. So I decieded to have a go at making my own. Firstly, I removed one of the screws by unscrewing it with a pair of needle nose pliers. Although this strategy would work for 1 or 2 screws, there were still 4 others which were deep set into the casing and not possibly removed without a screwdriver. But I only needed one of the special screws with which to make a screwdriver for the rest of them.
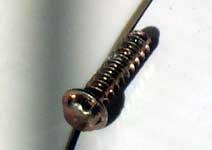
In short, I took a 3/16" hex driver bit, and in each of the 6 corners I superglued a 5mm length of 1/32" brass rod (see fig 2). The homemade bit worked perfectly, and with no help from Gaycar. Doing the mod was pretty straightforward, thanks to Mark Knibbs' excellent document. As mentioned previously, disabling the lockout chip was the key to getting the NTSC SF3 working with my PAL SNES console. Needless to say, once finished I screwed the SNES's casing back together with regular crosshead screws rather than the original security screws. Using the SF3You can (at your own legal risk) obtain SNES ROMs, copy them to 3.5" floppy disks on your PC and use them with the SF3. For some games it's a relatively simple task to transfer the image, but with others there can be more than a little fiddling around. The hassle arises from the fact that many ROM images were made with different SNES console imaging equipment other than the Game Doctor SF3, and that some ROM images are in a slightly different format to others. Another problem arises due to the fact that some games' ROM image is larger than 1.4MB (the size of a 3.5" floppy). As far as getting ROM images into your SF3 goes, some dude called Shaun has written a nice doco explaining it all, and there's no need for me to repeat it all here. SF3 and Battery Backed Save GamesSome carts, such as RPG's, come in a cartridge with a battery and some SRAM in them for saved games. The Game Doctor SF3 can emulate this feature. In the game, save as normal, then switch off the SNES breifly (don't unplug the SF3!), then turn it on whilst holding down the R button. This will bring up the SF3's utility menu, where (in there somewhere) you can opt to Save BRAM to disk. When you want to load the game, Load the Game itself using the SF3, then select to load the BRAM data off the disk to which it was previously saved. Then play the game as normal - and hopefully the save has worked. References & Links
|